
Jump to Your Favorite Section
What if you could combine the elegance of red velvet cake with the indulgent creaminess of cheesecake? Enter Red Velvet Cheesecake Brownies, the dessert that does it all. Fudgy, tangy, and undeniably Instagram-worthy, this decadent treat is perfect for nearly every occasion. From Valentine’s Day celebrations to casual weeknight indulgence, these brownies deliver a flavor and visual wow-factor that’s hard to resist.
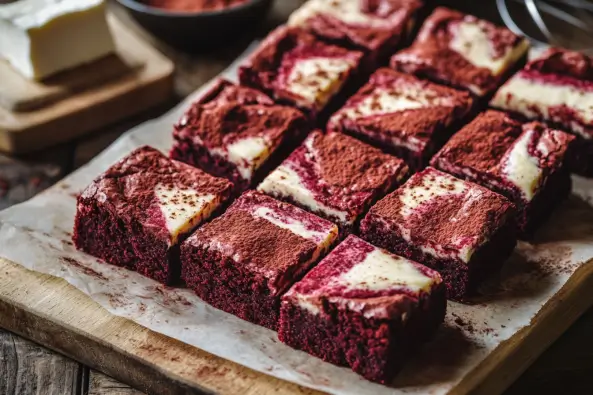
With a velvety red brownie base and creamy cheesecake swirled into a stunning marble pattern, this dessert is as delightful to look at as it is to eat. Ready to whip up a batch? Let’s explore how to make this masterpiece and why it deserves a spot on your dessert table.
Why Red Velvet Cheesecake Brownies Are a Must-Try Dessert
Combining the iconic flavors of red velvet cake and cheesecake into one dessert creates a perfect mix of sweet and tangy that’s truly irresistible. The fudgy red velvet base, enriched with cocoa and vanilla, perfectly complements the smooth, creamy cheesecake swirl on top.
A Feast for the Senses
- Taste: The tangy cream cheese balances the rich chocolate flavors of the red velvet layer, creating a luxurious mix.
- Texture: Enjoy the best of both worlds with a moist, fudgy base and a silky cheesecake layer.
- Visual Appeal: The marbled swirl isn’t just stunning; it’s a conversation starter for holidays, birthdays, or potlucks.
Perfect for Any Occasion
From family gatherings to fancy dinner parties, these brownies make an impression wherever they’re served. They’re also a top choice for festive occasions like Christmas or Valentine’s Day. If you’re looking for more holiday inspiration, check out Hershey’s red velvet blossoms for festive occasions, another creative take on red velvet desserts.
How to Make the Best Red Velvet Cheesecake Brownies at Home
Preheat the Oven
The key to perfectly baked brownies starts with a properly preheated oven. Set your oven to 350°F (175°C) and line an 8×8-inch baking pan with parchment paper, leaving enough overhang for easy removal. This simple step ensures even baking and prevents sticking.
Prepare the Red Velvet Brownie Batter
Ingredients for the Brownie Base:
- ½ cup unsalted butter, melted
- 1 cup granulated sugar
- 2 large eggs
- 1 teaspoon vanilla extract
- 1 tablespoon red food coloring
- 2 tablespoons cocoa powder
- ¾ cup all-purpose flour
- ¼ teaspoon salt
Instructions:
- In a large mixing bowl, whisk together melted butter and sugar until smooth.
- Add eggs, one at a time, whisking well after each addition.
- Stir in vanilla extract and red food coloring. Adjust the food coloring for a deeper red if desired.
- In a separate bowl, sift together cocoa powder, flour, and salt.
- Gradually fold the dry ingredients into the wet mixture using a spatula, being careful not to overmix.
Pro Tip: If you prefer natural alternatives to food coloring, try beetroot powder. It offers a vibrant hue without artificial additives.
Prepare the Cheesecake Layer
Ingredients for the Cheesecake Layer:
- 8 ounces cream cheese, softened
- ¼ cup granulated sugar
- 1 large egg
- ½ teaspoon vanilla extract
Instructions:
- Beat the softened cream cheese and sugar together in a medium bowl until smooth and creamy.
- Add the egg and vanilla extract, mixing until fully combined. Avoid overbeating to prevent air bubbles.
- Set aside the mixture for layering.
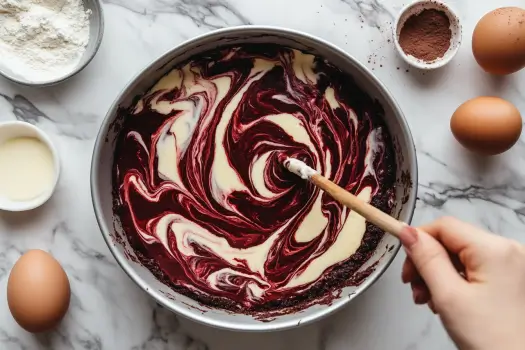
Assemble the Layers
- Pour the red velvet batter into the prepared baking pan, reserving about ¼ cup for the top swirl.
- Spread the cheesecake mixture evenly over the red velvet layer.
- Dollop the reserved red velvet batter over the cheesecake layer.
- Using a toothpick or skewer, gently swirl the batter and cheesecake to create a marbled effect. Avoid overmixing to keep distinct patterns.
Bake to Perfection
Place the pan in the preheated oven and bake for 30-35 minutes. Test for doneness by inserting a toothpick into the center; it should come out with a few moist crumbs but no raw batter.
Once baked, allow the brownies to cool in the pan for about 10 minutes before transferring them to a wire rack to cool completely. Chilling in the fridge for an hour before slicing ensures clean, sharp cuts.
Tips for Baking Success
Room Temperature Ingredients
Using room-temperature eggs and cream cheese ensures a smooth batter and even baking. Cold ingredients can lead to lumps in the cheesecake layer.
Swirling Techniques
For a professional-looking swirl, make small, controlled circular motions with a toothpick. Start from the edges and work your way toward the center.
Don’t Overbake
Brownies continue to set as they cool. Overbaking can result in a dry texture, so aim for slightly underdone when performing the toothpick test.
Delicious Variations for Red Velvet Cheesecake Brownies
Flavor Enhancements
- Chocolate Chips: Add a handful of chocolate chips to the brownie batter for extra richness. Use a mix of milk, dark, and white chocolate chips for more flavor.
- Raspberry Swirl: Add dollops of raspberry jam alongside the cheesecake layer for a fruity twist. Use fresh mashed raspberries sweetened with sugar for more flavor.
- Nutty Crunch: Sprinkle chopped pecans, walnuts, or hazelnuts on top before baking. Toast the nuts first to bring out their flavor.
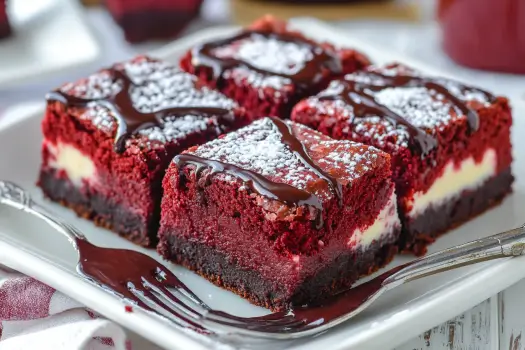
- Caramel Drizzle: Once the brownies have cooled, drizzle caramel sauce over the top. Add a pinch of sea salt for a salty-sweet finish.
Dietary Adaptations
- Gluten-Free: Replace all-purpose flour with a gluten-free baking blend. Brands like Bob’s Red Mill or King Arthur work well.
- Natural Dyes: Use beetroot powder, pomegranate juice, or turmeric for a natural hue. The colors will be subtler but perfect for those preferring natural ingredients.
- Dairy-Free Option: Substitute cream cheese with a plant-based cream cheese and use vegan butter. Ensure chocolate chips are dairy-free.
For more cheesecake dessert ideas, check out Churro-inspired cheesecake dessert recipes.
Storage Instructions
Room Temperature
Store these brownies in an airtight container at room temperature for up to 2 days. Keep them in a cool, dry place to maintain their texture and flavor. If it’s warm, refrigeration is better.
Refrigeration
Refrigerate the brownies in an airtight container for up to 1 week. Let them sit at room temperature for about 20 minutes before serving. This helps the flavor and texture shine, as cold brownies can feel firm.
Freezing
To freeze, wrap each brownie square in plastic wrap to prevent freezer burn. Place them in a freezer-safe container and layer foil on top for extra protection. Store in the freezer for up to 3 months. Thaw in the fridge overnight and bring to room temperature before serving.
Frequently Asked Questions
Yes! Substitute all-purpose flour with a gluten-free blend for the same delicious results.
Red velvet brownies include a hint of cocoa, a tangy kick from vinegar or buttermilk, and their signature red color.
Use a 9×13-inch pan and extend the baking time by 5-10 minutes. Watch for doneness to avoid overbaking.
Skip it for “velvet” cheesecake brownies or use natural options like beet juice or powdered food dyes.
Conclusion
Red Velvet Cheesecake Brownies are a perfect dessert for anyone who loves rich, fudgy treats and creamy cheesecake. The marbled swirl and indulgent flavors make them great for gatherings or a sweet pick-me-up.
Try this recipe, share it with loved ones, and snap a photo for Instagram. Pair these brownies with coffee or tea for the ultimate treat. For more baking ideas, check out Soft and chewy chocolate chip cookie recipes. Happy baking!